WURFL Docs MCP Server
The WURFL Docs MCP Server (WDM) makes WURFL documentation and capabilities accessible to your AI assistant through the Model Context Protocol (MCP)—a standard that allows AI assistants like Claude to access external tools and information.
Introduction
With the WURFL Docs MCP Server (WDM), instead of relying on generic or outdated knowledge, your AI assistant can now:
- Query official WURFL documentation
- Look up authoritative definitions for WURFL capabilities
- Search integration guides and help articles
- View available releases for WURFL API products
- Detect devices from User-Agent strings
This means your AI assistant has access to accurate, up-to-date information directly from ScientiaMobile.
Ready to get started? Jump to setup →
What the WURFL Docs MCP Server Can Do
Access WURFL Documentation
WDM will search and retrieve the complete WURFL API documentation from docs.scientiamobile.com:
- Search documentation by keyword (Python, PHP, Java, Node.js, etc.)
- Retrieve complete integration guides with code examples
- Browse all available WURFL products (InFuze, OnSite, WURFL.js, Microservice, and more)
- Get function definitions and specifications
Example: Ask Claude "How do I integrate my Python project with WURFL API?" and get the latest integration guide automatically.

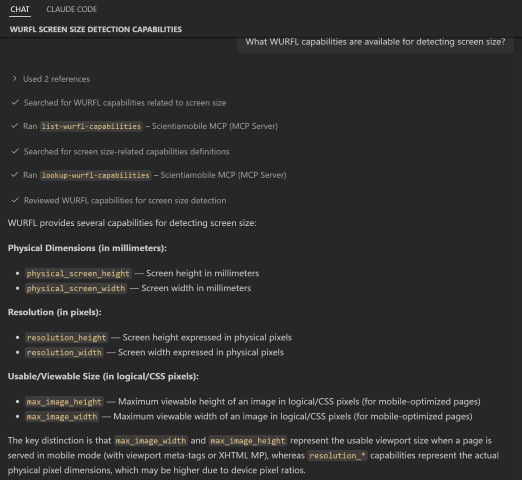
Query WURFL Capabilities
Explore and understand WURFL device capabilities:
- List all available capabilities with filtering by category or type
- Get authoritative definitions including names, data types, and possible values
Example: Ask "What WURFL capabilities are available for detecting screen size?" to get official information about relevant capabilities.
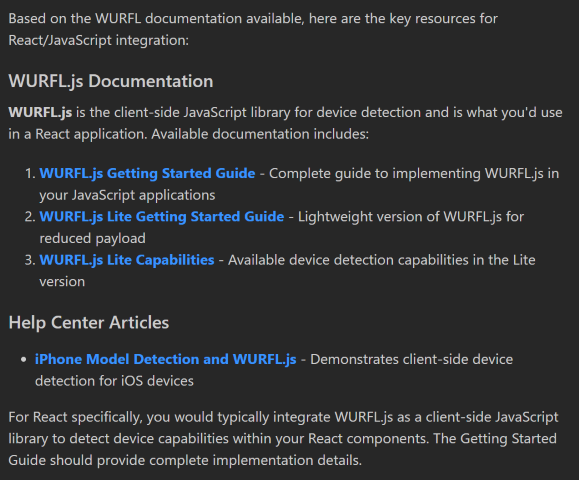
Browse Support Portal Articles
Access integration guides, tutorials, and best practices from the support portal:
- Integration guides for React, Vue, Angular, Magento, WordPress, and more
- User-Agent Client Hints implementation guides
- Customer Vault usage and management
- WURFL best practices and troubleshooting guides
Example: Ask "Find articles and documentation about React integration with WURFL" to browse relevant help center articles.
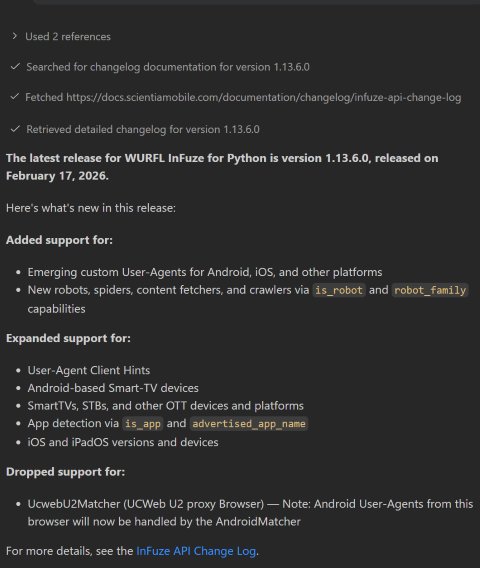
Check Package Releases
Browse available software versions for WURFL API products, including modules for WURFL InFuze, WURFL OnSite APIs, WURFL.js, WURFL Microservice, and more.
Example: Ask "What is the latest release for the WURFL Python API, and what is new in the latest release?" to see available versions with release dates.
Identify Devices by User-Agent
Submit a User-Agent string and get back a fixed set of device capabilities, right inside your AI assistant. Results include identifying information such as device name, form factor, OS, browser, and screen dimensions. See WURFL Capabilities below for the full list of returned fields.
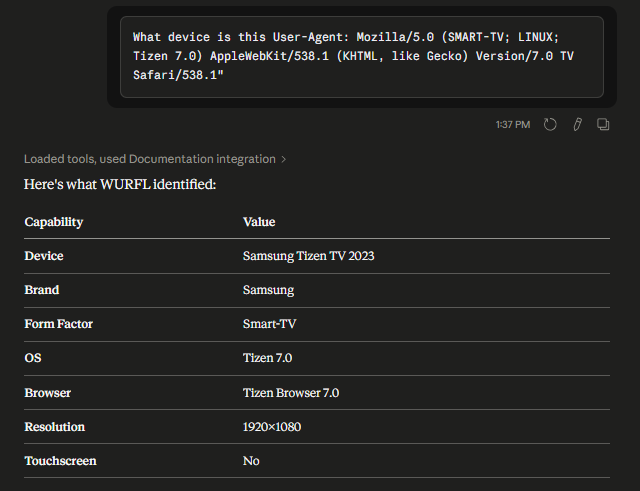
Identify a Device from a User-Agent String
Ask your AI assistant to identify a device from its User-Agent string and return the device name, type, operating system, browser, and WURFL Device ID.
Example prompt: - "What device is this User-Agent: Mozilla/5.0 (SMART-TV; LINUX; Tizen 7.0) AppleWebKit/538.1 (KHTML, like Gecko) Version/7.0 TV Safari/538.1"
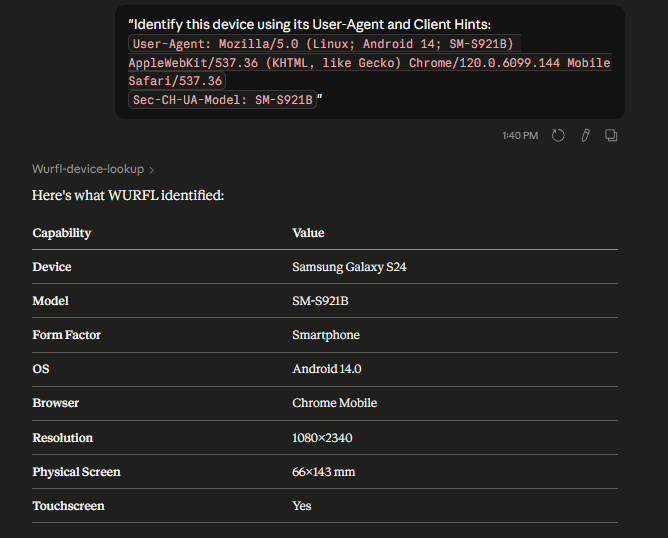
Using Client Hints for Better Detection Accuracy
For more accurate device identification, you can pass Client Hints headers alongside your User-Agent string. The Sec-CH-UA-Model header can help provide additional model information to improve detection results.
Example prompt:
- "Identify this device using its User-Agent and Client Hints:
User-Agent: Mozilla/5.0 (Linux; Android 14; SM-S921B) AppleWebKit/537.36 (KHTML, like Gecko) Chrome/120.0.6099.144 Mobile Safari/537.36 Sec-CH-UA-Model: SM-S921B"
Note: A User-Agent string is still required. Client Hints alone are not sufficient for detection.
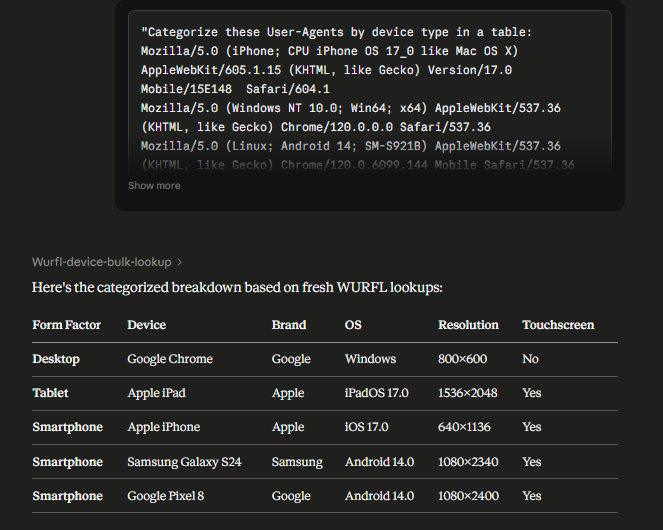
Identify Multiple Devices at Once
Pass a list of User-Agent strings and get back a formatted summary table with detection results for all of them in a single operation.
Example prompt: - "Categorize these User-Agents by device type in a table: Mozilla/5.0 (iPhone; CPU iPhone OS 17_0 like Mac OS X) AppleWebKit/605.1.15 (KHTML, like Gecko) Version/17.0 Mobile/15E148 Safari/604.1 Mozilla/5.0 (Windows NT 10.0; Win64; x64) AppleWebKit/537.36 (KHTML, like Gecko) Chrome/120.0.0.0 Safari/537.36 Mozilla/5.0 (Linux; Android 14; SM-S921B) AppleWebKit/537.36 (KHTML, like Gecko) Chrome/120.0.6099.144 Mobile Safari/537.36 Mozilla/5.0 (iPad; CPU OS 17_0 like Mac OS X) AppleWebKit/605.1.15 (KHTML, like Gecko) Version/17.0 Mobile/15E148 Safari/604.1 Mozilla/5.0 (Linux; Android 14; Pixel 8) AppleWebKit/537.36 (KHTML, like Gecko) Chrome/120.0.6099.144 Mobile Safari/537.36"
Note: The bulk lookup service is intended for interactive use by AI assistants only. Automated or non-interactive use is considered abuse and may be blocked at ScientiaMobile's discretion.
WURFL Capabilities
The device lookup tool returns results from among a fixed set of capabilities for each detected device:
wurfl_id, brand_name, complete_device_name, marketing_name, model_name, form_factor, is_smartphone, is_tablet, is_touchscreen, device_os, device_os_version, mobile_browser, resolution_height, resolution_width, physical_screen_height, physical_screen_width
The bulk lookup tool additionally returns is_mobile for each device.
These are the only fields returned by the device lookup tool — no other capabilities will appear in the output, regardless of what you ask for. To learn what any WURFL capability measures, ask your AI assistant (for example, "What is the WURFL capability is_connected_tv?") or browse the WURFL Capabilities reference. For access to a broader set of capabilities, including premium capabilities, use the WURFL API directly — contact our sales team to learn more.
Note: Your AI assistant may present some fields in a combined format — for example,
resolution_heightandresolution_widthmay be shown as a single "1080x2340" value rather than two separate fields. The underlying data is the same. For unmerged individual fields, ask for results in CSV format using the bulk lookup tool.Note: Results from the device lookup tools reflect WURFL data. Your AI assistant may also generate additional commentary or analysis alongside these results — this supplementary text is produced by the AI and is not sourced from WURFL. For authoritative raw output, ask for results in CSV format using the bulk lookup tool, or use the WURFL API directly.
Getting Started
Prerequisites
You'll need:
- A supported AI assistant (we currently support Claude Desktop, Claude Code, Cursor, and VS Code Copilot, but most other MCP clients should work as long as they support Streamable HTTP or SSE).
- A ScientiaMobile account
- An internet connection for accessing the WURFL Docs MCP Server
Authentication
You'll need a ScientiaMobile account. Authentication happens automatically on first use when you ask the AI assistant a question about WURFL. During setup, you'll log in with your ScientiaMobile account credentials with no special configuration needed.
Choose Your Setup Path
Pick your AI assistant and follow the setup guide:
Next Steps
- Choose your AI assistant (see "Choose Your Setup Path" above)
- Follow the setup guide
- Verify setup by asking your AI a question about WURFL
- Explore the MCP server's abilities by using example prompts above
Common Questions
Q: Do I need a ScientiaMobile account?
A: Yes, you'll need a ScientiaMobile account to access the WURFL Docs MCP Server. You can register for an account free-of-charge.
Q: What if I'm behind a firewall?
A: Verify your firewall allows connections to https://mcp-docs.scientiamobile.com. Contact your IT department if you have connectivity issues.
Q: How often is the documentation updated?
A: WURFL documentation is updated as ScientiaMobile releases new documentation. The MCP server retrieves current documentation in real-time.
Q: Do I need internet access?
A: Yes, the WURFL Docs MCP Server requires internet connectivity to access documentation and tools.
Q: Is my data secure?
A: Yes. All connections use HTTPS encryption. OAuth tokens are securely cached by your MCP client.
Q: Do you have any tips for the most efficient use of the WURFL Docs MCP Server?
A: Ask clear questions: The more specific, the better results. Use @mentions: Use @wurfl-docs to prioritize tools from specific servers
Claude Desktop Setup
System Requirements
- Claude Desktop installed (download here)
- Pro, Max, Team, or Enterprise plan required
- ScientiaMobile account
- Internet connection
Setup Steps
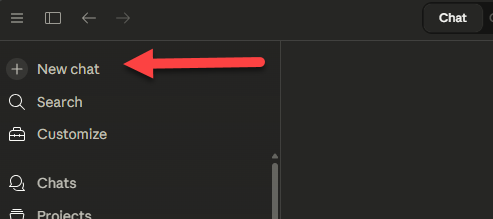
Step 1: Open a New Chat
Launch Claude Desktop and click the + button to start a new chat.
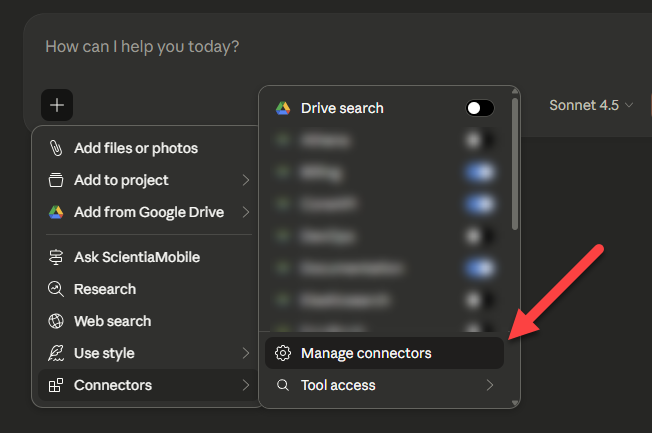
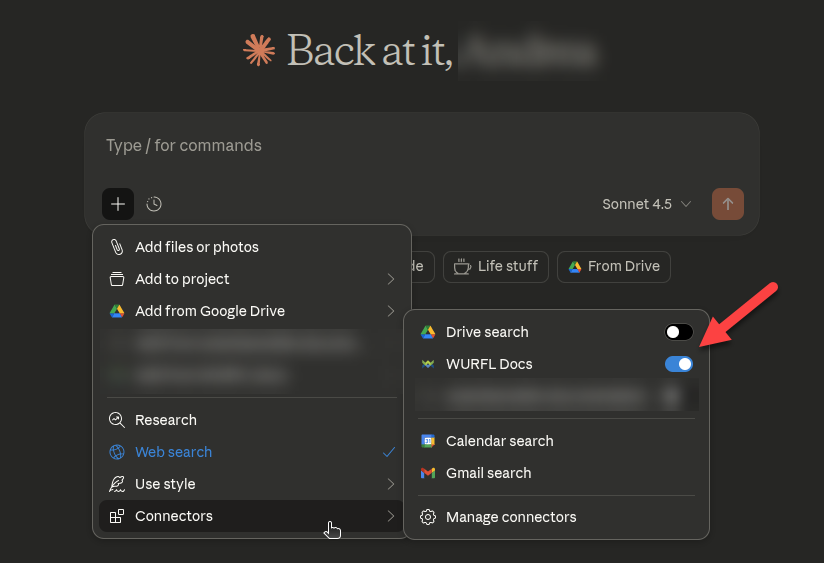
Step 2: Access Connectors
In the chat window, expand the + sign, then look for the Connectors option and hover on it.
Click on Manage Connectors to access the connectors management page.
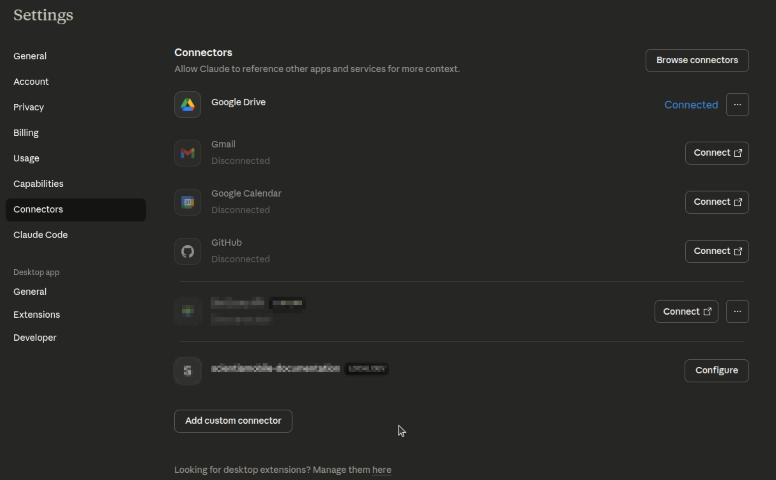
The Connectors management page allows you to add and manage connections to external MCP servers like WURFL Docs.
Step 3: Add Custom Connector
Click the Add custom connector button at the bottom of the page.
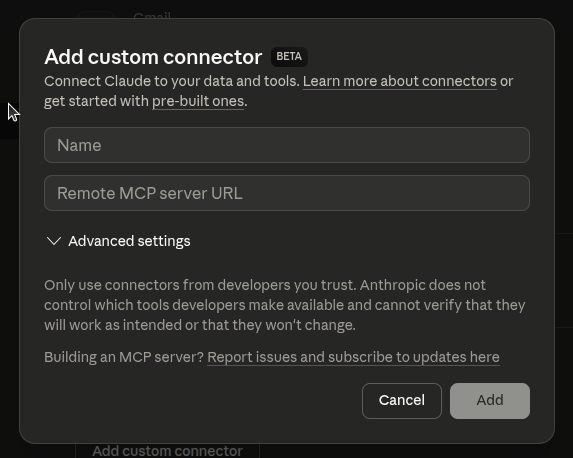
Note: The "Add custom connector" feature is currently in BETA, and is limited to account owners. If you don't see this option, or are unable to interact with it, please check with your IT department or contact Claude support.
Step 4: Enter WURFL Docs Server Details
In the Add custom connector dialog:
- Name: Enter
WURFL Docs(or any name you prefer) - Remote MCP server URL: Enter:
https://mcp-docs.scientiamobile.com/mcp - Click Add
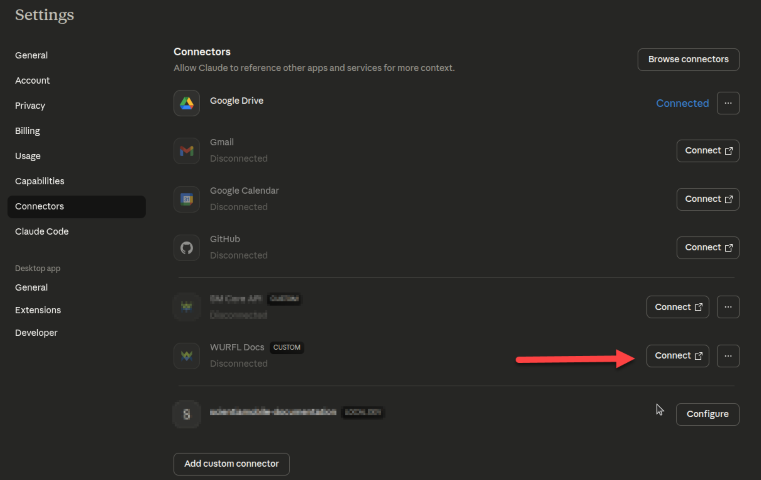
Step 5: Connect to WURFL Docs
- Back in the Connectors list, find WURFL Docs
- Click the Connect button on the right of WURFL Docs
Step 6: Authenticate with ScientiaMobile
Your browser opens to the ScientiaMobile OAuth login page.
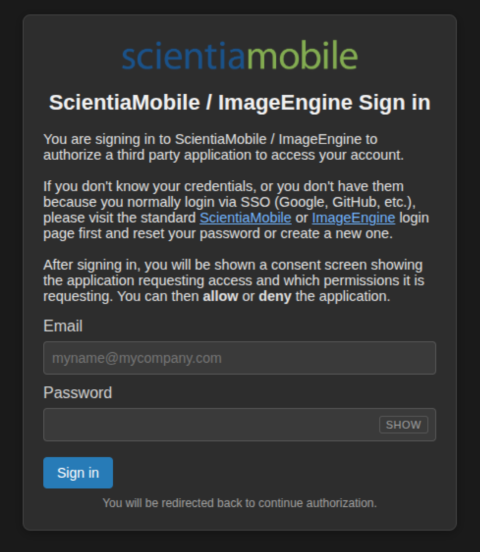
Enter your ScientiaMobile credentials: - Your ScientiaMobile account email - Your ScientiaMobile account password
Step 7: Grant Permissions
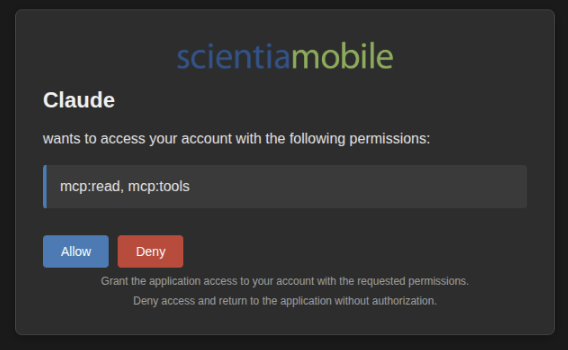
- Review the permissions:
mcp:read, mcp:tools - Click Allow to grant access
Step 8: Open Claude Desktop
After approving permissions, the browser will ask for permission to return to Claude Desktop. Click Open Claude.

Step 9: Verify Connection
The connector status changes to Connected. You're now ready to use WURFL Docs!
Using MCP Tools in Claude Desktop
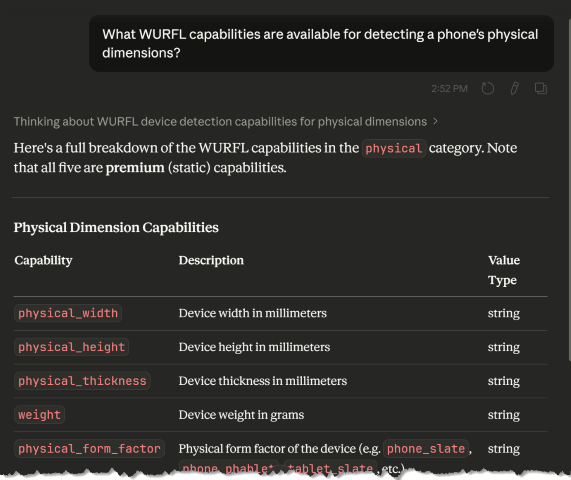
In a Claude chat, try asking a question about WURFL:
Example: What WURFL capabilities are available for detecting a phone's physical dimensions
On your first tool use, Claude shows a dialog asking permission to use the WURFL Docs connection. Review the tool description and click Always Allow to permit future uses without prompting.
You're done! Your Claude Desktop is now connected to the WURFL Docs MCP Server. Start asking questions about WURFL documentation, capabilities, and more.
Claude Code / CLI Setup
System Requirements
- Claude Code installed (download here)
- ScientiaMobile account
- Terminal/command line access
- Internet connection
Setup Steps
Step 1: Add the MCP Server
Open your terminal and run this command to add the WURFL Docs MCP Server:
claude mcp add -s user -t http wurfl-docs https://mcp-docs.scientiamobile.com/mcp

Step 2: Verify the MCP Server
Run this command to verify that wurfl-docs appears in your MCP server list:
claude mcp list

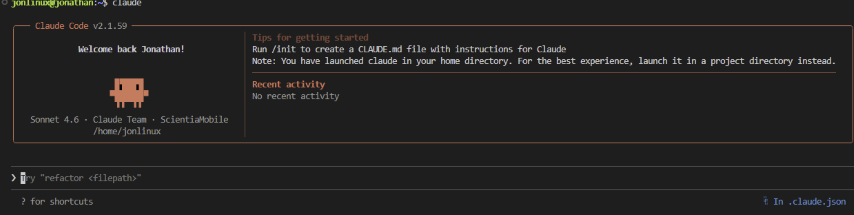
Step 3: Launch Claude Code
Start Claude Code by running:
claude
Claude Code opens with a welcome screen:
Step 4: Manage and Authenticate MCP Servers
Type the MCP management command:
/mcp
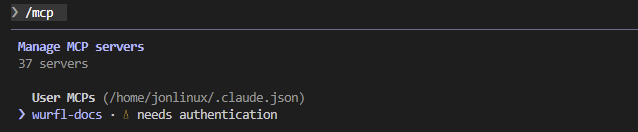
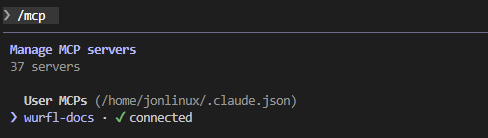
Claude Code displays a list of all configured MCP servers with their connection status.
Example output:
Step 5: Authenticate
To use the server, you need to authenticate the wurfl-docs MCP server:
- Navigate using arrow keys to select the server
Press Enter to show the details for the MCP server including authentication status
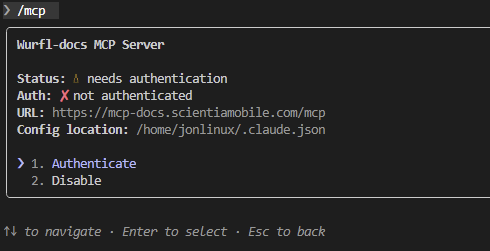
Press Enter on Authenticate to start the authentication process
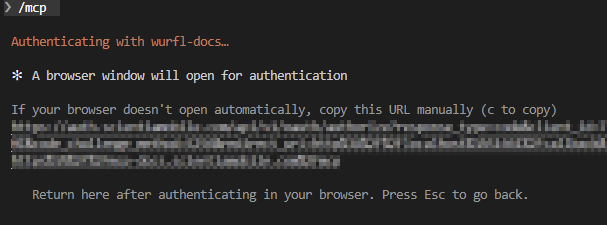
Claude Code will attempt to open your web browser to the ScientiaMobile OAuth login page. If your browser doesn't open automatically, copy the on-screen URL to your browser manually.
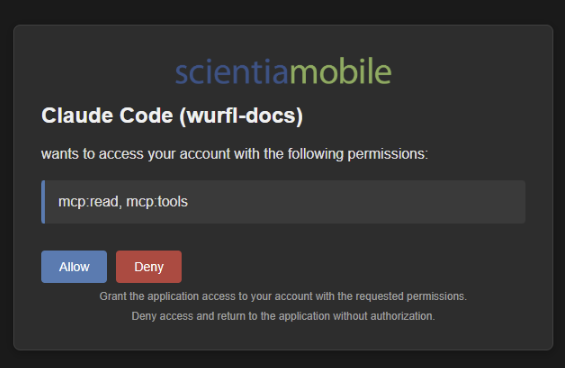
Authentication Flow:
Login: Enter your ScientiaMobile email and password
Consent: Review requested permissions (mcp:read, mcp:tools) and click Allow
Success Page: A page with a success message will appear
- Success: Claude confirms that authentication was successful. Use the
/mcpcommand again to verify. The server status should now show√ connected
Example after authentication:
Step 6: Verify Setup
Now type a prompt to verify the server works:
Example: What is the WURFL release_msrp capability?
Claude automatically uses the connected WURFL MCP server to answer your question. You will be asked to allow the usage of the MCP tool. The first time you use a tool, it may take a few seconds—subsequent calls are faster due to caching.
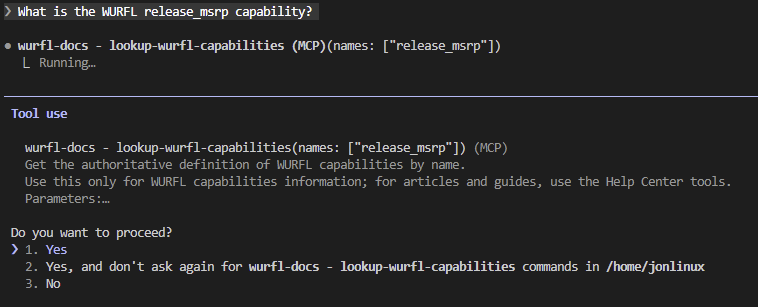
When you allow it, the result will be processed and shown.

Cursor Setup
System Requirements
- Cursor installed (download here)
- ScientiaMobile account
- Internet connection
Setup Steps
Step 1: Open MCP Settings
- Open Cursor
- Open the command palette:
- macOS: Cmd+Shift+P
- Windows/Linux: Ctrl+Shift+P
- Type:
MCP - Click on
View: Open MCP Settings

Step 2: Configure the WURFL Docs MCP Server
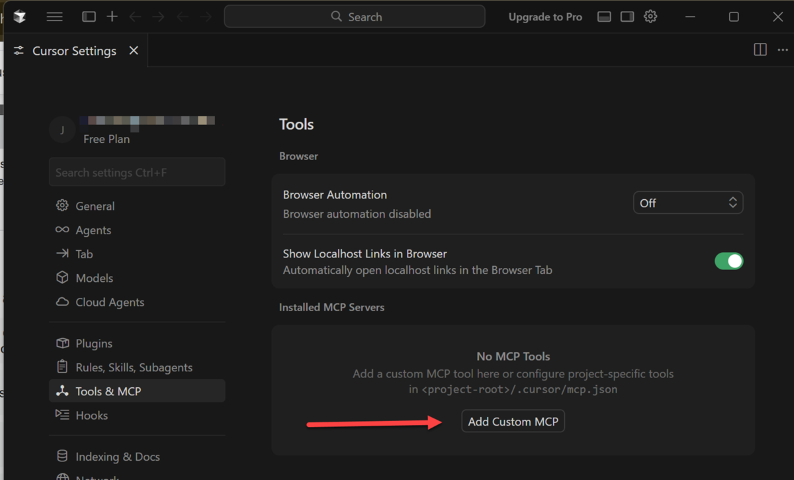
The Tools & MCP settings panel opens automatically.
Click on the Add Custom MCP button. The mcp.json file will open.
Production Configuration (Recommended)
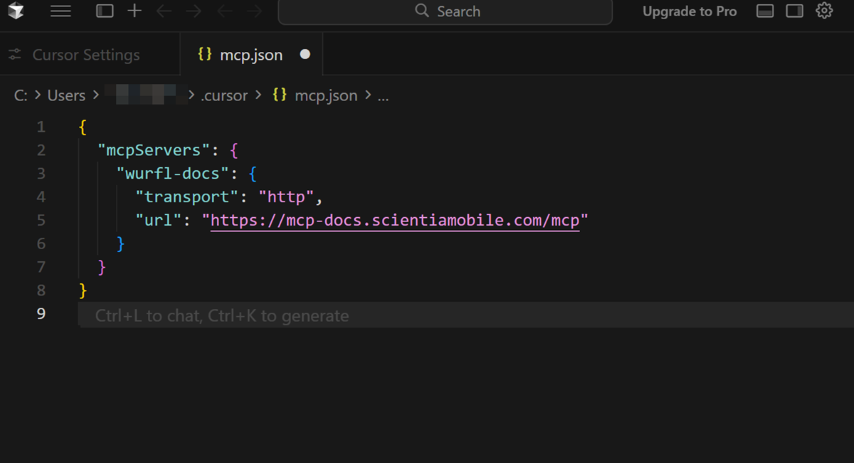
Add the wurfl-docs field to your mcpServers section:
{
  "mcpServers": {
    "wurfl-docs": {
      "transport": "http",
      "url": "https://mcp-docs.scientiamobile.com/mcp"
    }
  }
}
Step 3: Save Configuration
- Save the file (Cmd+S or Ctrl+S)
- Cursor automatically reloads the MCP configuration
- No restart required! (Unlike other editors)
Configuration changes take effect immediately in Cursor.
Cursor will notify you that the MCP Server needs authentication. Click on the notification.
If you miss the notification, don't worry — Cursor will ask you again on first use, or you can navigate to the Tools & MCP Panel directly.
Step 4: Set Up Authentication
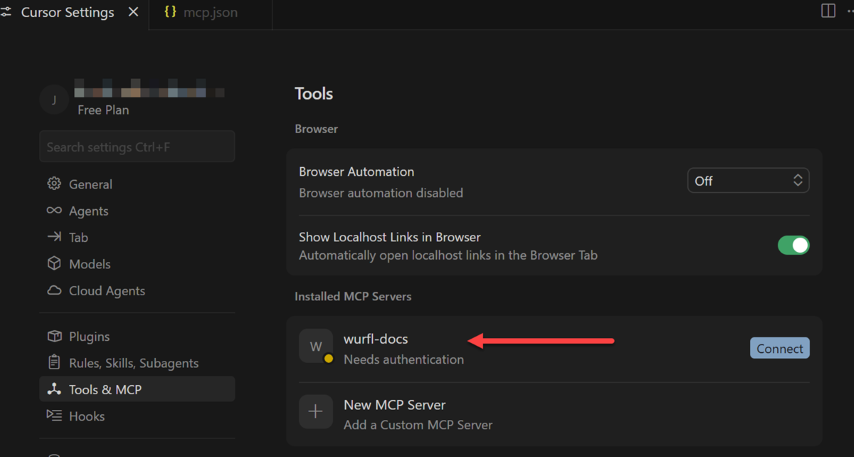
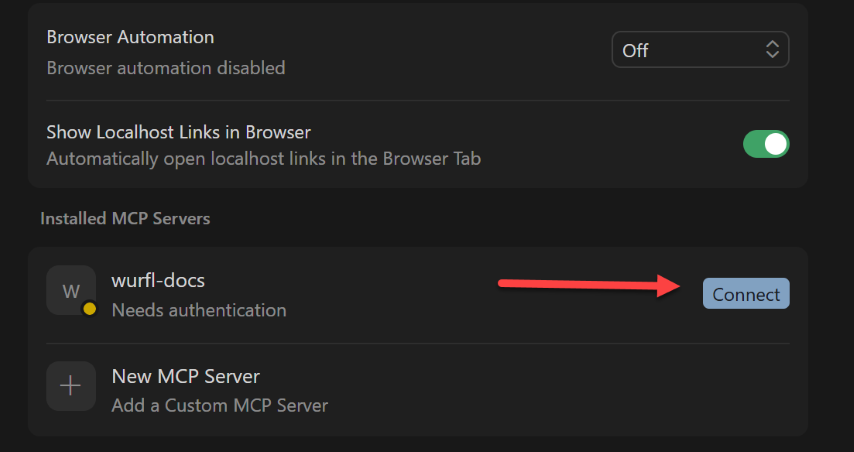
In the Tools & MCP Panel you will see the wurfl-docs MCP Server and a text that says Needs authentication.
Click on the Connect button on the right.
Cursor will ask you to open a browser window. Click on the Open button.
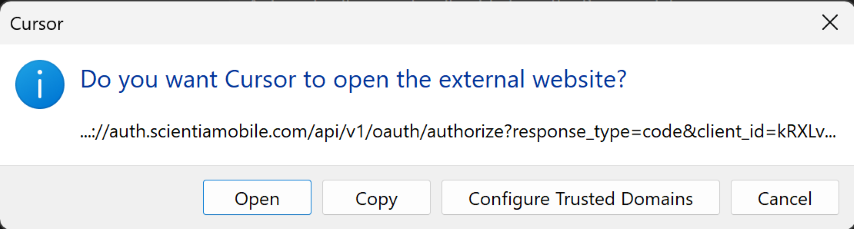
Your default browser will open to the ScientiaMobile authentication form.
Authentication Flow
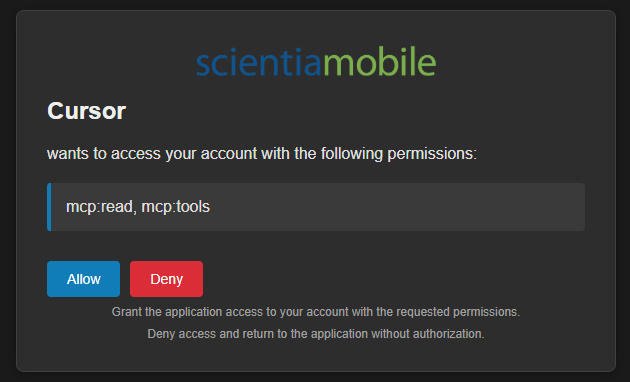
Login: Enter your ScientiaMobile email and password
Consent: Review requested permissions (mcp:read, mcp:tools) and click Allow
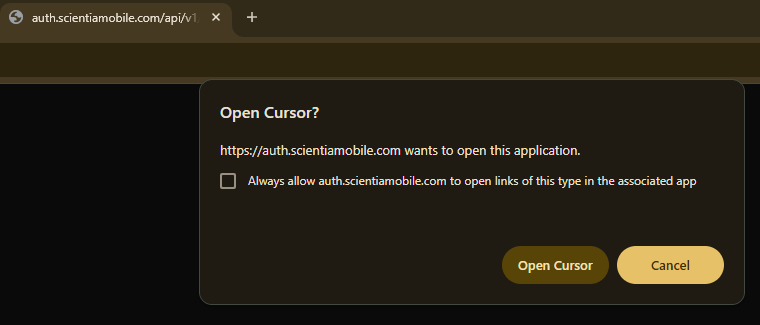
Redirect: The browser will ask for permission to redirect you back to Cursor. Click Open Cursor.
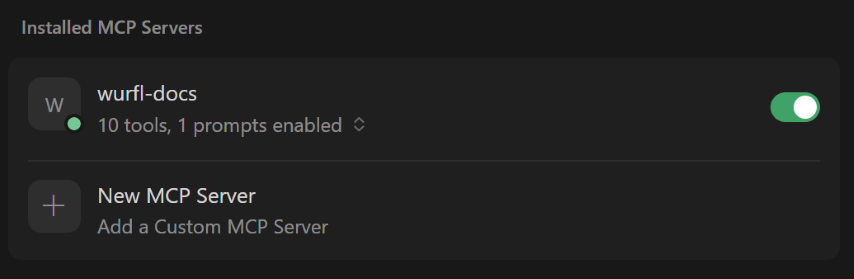
The connector status now shows 10 tools and 1 prompt enabled.
Using MCP Tools in Cursor
Chat Panel
The Chat Panel is the main interface for using MCP tools. Open it with Cmd+Shift+L (Ctrl+Shift+L on Windows/Linux):
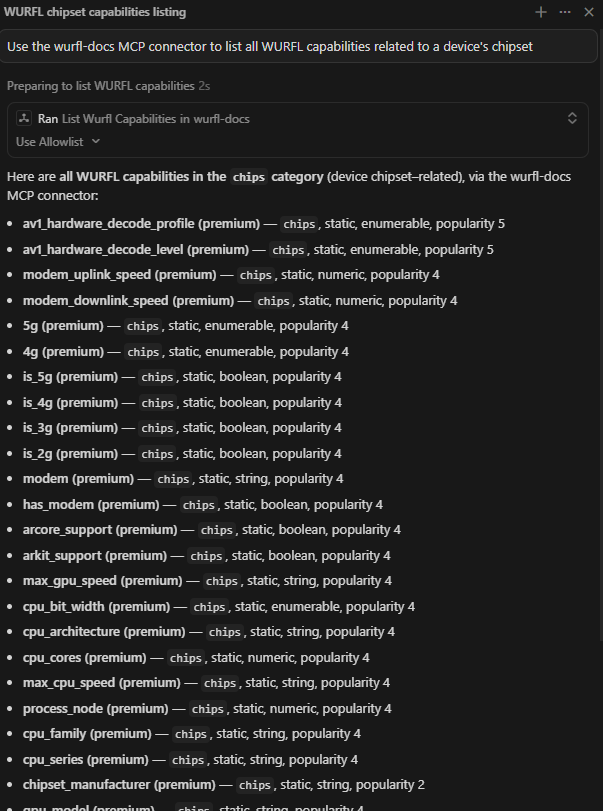
Example: Use the wurfl-docs MCP connector to list all WURFL capabilities related to a device's chipset.
VS Code Copilot Setup
System Requirements
- VS Code installed (download here)
- GitHub Copilot extension installed and activated
- ScientiaMobile account
- Internet connection
Setup Steps
Step 1: Execute MCP: Add Server
- Open VS Code
- Open the command palette:
- macOS: Cmd+Shift+P
- Windows/Linux: Ctrl+Shift+P
- Type:
MCP: Add Server
- Press Enter
Step 2: MCP Server Type Prompt
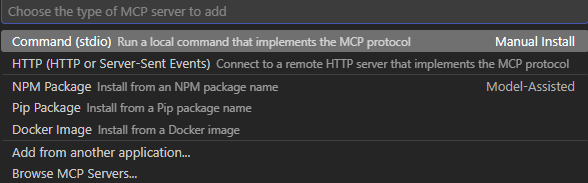
Select HTTP from the options displayed.
Step 3: Enter Server URL
VS Code will show you a prompt where to enter the server URL.

Enter the following address:
https://mcp-docs.scientiamobile.com/mcp
Press Enter.
Step 4: MCP Server ID
VS Code will ask you to name the MCP server.

Type in a descriptive ID of your choosing and hit Enter.
Step 5: Configuration Target
VS Code will ask you to choose whether the configuration target is Workspace or Global.

VS Code provides different scopes for settings. From VS Code documentation:
- Global settings — Settings that apply globally to any instance of VS Code you open.
- Workspace settings — Settings stored inside a workspace and only apply when that workspace is opened.
Step 6: Authentication
VS Code will automatically open the mcp.json file and shortly after an alert will ask you to allow authentication.
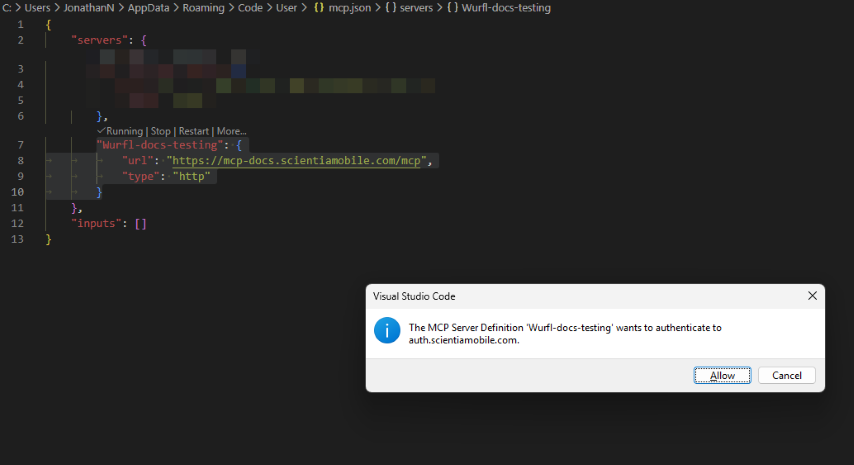
Click on the Allow button.
Next, VS Code will ask you to open a browser window. Click on the Open button.
Your default browser will open to the ScientiaMobile authentication form.
Authentication Flow:
Login: Enter your ScientiaMobile email and password
Consent: Review requested permissions (mcp:read, mcp:tools) and click Allow
Note: The AI assistant named on the permissions screen will vary depending on which AI model you have configured in VS Code Copilot.
Redirect: The browser will ask you to allow it to redirect you back to VS Code. Click Open ...
Step 7: Verify Configuration
Verify that the mcp.json file that should already be open contains the following:
{
    "servers": {
        "wurfl-docs": {
            "url": "https://mcp-docs.scientiamobile.com/mcp",
            "type": "http"
        }
    },
    "inputs": []
}
Using MCP Tools in VS Code Copilot
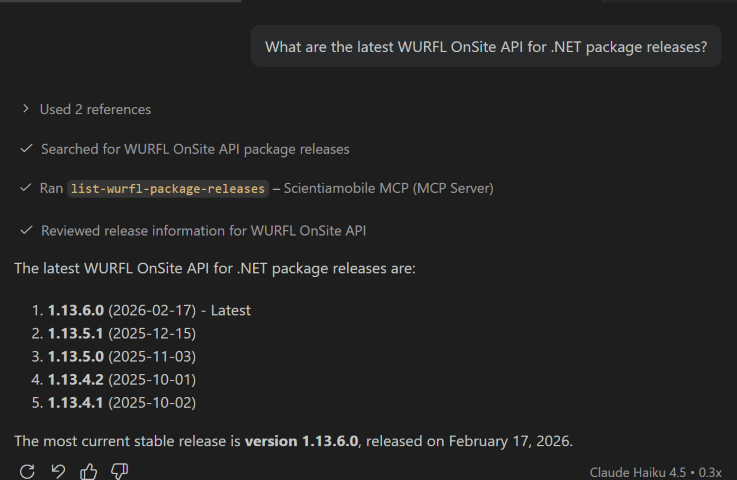
Now you can use the VS Code Chat feature to talk to your preferred AI model and allow it to use the WURFL Docs MCP Server tools.
Example: What are the latest WURFL OnSite API for .NET package releases?
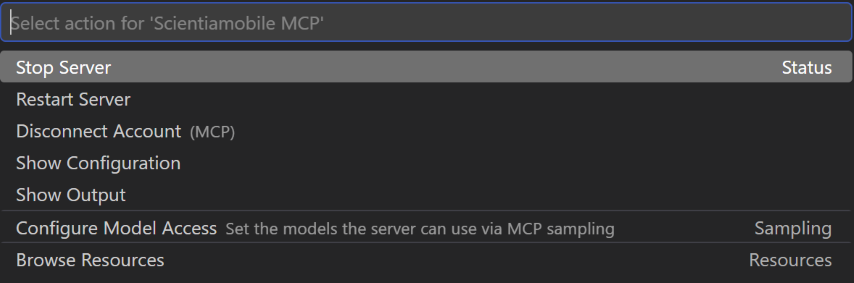
Managing MCP Servers
View Configured Servers
- Open the command palette: Cmd+Shift+P (macOS) / Ctrl+Shift+P (Windows/Linux)
- Type:
MCP: List Servers
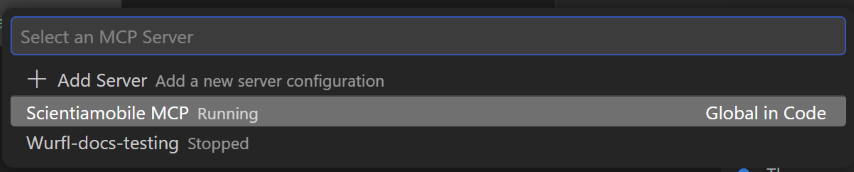
This will show you a list of all configured MCP servers with their connection status. Select the server you want to manage and hit Enter.
© 2026 ScientiaMobile Inc.
All Rights Reserved.
NOTICE: All information contained herein is, and remains the property of ScientiaMobile Incorporated and its suppliers, if any. The intellectual and technical concepts contained herein are proprietary to ScientiaMobile Incorporated and its suppliers and may be covered by U.S. and Foreign Patents, patents in process, and are protected by trade secret or copyright law. Dissemination of this information or reproduction of this material is strictly forbidden unless prior written permission is obtained from ScientiaMobile Incorporated.
1875 Campus Commons Dr.
Suite 300
Reston, VA 20191
USA


