WURFL Microservice for AWS Marketplace

Using WURFL Microservice for AWS will allow you to run your own WURFL-based device detection service in your hosting infrastructure by deploying familiar AWS AMI images. If you are not familiar with AWS and the possibilities of the Amazon Cloud infrastructure, here is a good place to get started.
WURFL Microservice Client API (WM Client)
Given an HTTP Request and a device capability name, the WURFL Client API will return the corresponding property value.
You can integrate the WURFL Microservice Standard, Basic or Pro Edition with major programming languages, including:
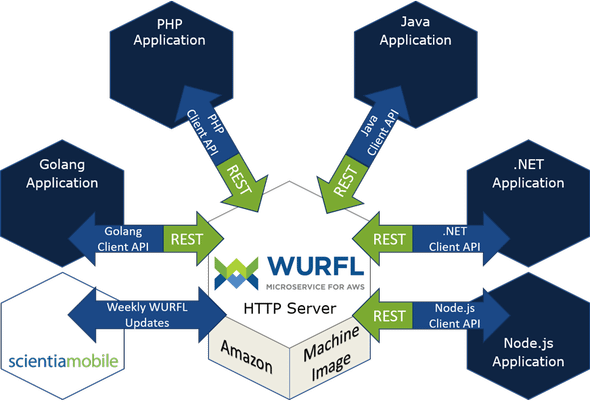
WURFL Microservice Architecture
WURFL Microservice Server (WM Server) is a service that exposes its functions to the WURFL Microservice Client API (WM Client). The Client API depends on the availability of the WM server to work.
The following diagram explains the overall architecture of WURFL Microservice as deployed through the AWS Marketplace. The AMI will start an instance of the WM Server. In addition to supporting the REST interface for WM Clients, the service will periodically query ScientiaMobile for updates to the WURFL Device Description Repository to include the profiles of newly released devices and updated API logic.
Note 1: While the WM Client feels like a "standalone API" for most practical purposes, under the hood it requires interaction with the WURFL Microservice HTTP server (running in AWS) which introduces some latency (hugely mitigated by the built-in caching layer in the WM Client itself). For this reason, ScientiaMobile does not refer to the WURFL Microservice Client API (WM Client) as a "WURFL API" (that name is reserved for the WURFL OnSite APIs ).
Note 2: The WM Server needs to have access to ScientiaMobile servers to obtain data and updates to the API logic. In high-security scenarios, access to outside internet-based services may be blocked. In those cases, your firewall may need to be configured to allow traffic between the WM Server and ScientiaMobile: outbound internet access on TCP port
443and DNS is required.
Note 3: communication between the WM Client API and the WM Server happens through a REST API, but this is totally transparent to users of WURFL Microservice and ScientiaMobile acknowledges this aspect of the WURFL Microservice product for sake of transparency. Unless you have a very specific use-case(s), we strongly discourage you from utilizing the REST Interface directly. Not only does the WM Client provide a caching layer (which delivers much greater performance), but ScientiaMobile reserves the right to modify the internal REST API or even to switch to different non-REST protocols in future versions of the product without notice.
Subscribing the AMI
Go to the AWS Marketplace
Searching for WURFL in the searchbox at the top will bring up the ScientiaMobile listing.


While the WURFL Microservice AMI is available as a public offer on AWS, you may also contact ScientiaMobile to discuss a private offer that can provide a personalized set of WURFL capabilities specifically tailored to your requirements.
Once the subscription is complete, you will be provided with an API key to configure the AMI instance.
Launching the AMI instance from EC2 Console
When launching the AMI from the EC2 Console, you have complete control over every configuration detail.

Among other things, please note the following:
- Network setting
You will be asked to configure the security group. Ports 80 and 22 are opened by default.
Port 80 is used to talk HTTP to the WURFL Microservice HTTP server, while port 22 allows SSH access to the AMI instance.
If for some reason, port 80 is not open by default, you will need to add it .
- Advanced details
In the Metadata version field, set the value to V1 and V2
In the User data field, enter the provided API key

Testing the AMI instance
Copy the IP address that you see in the “IPv4 Public IP” text field of your EC2 Instances dashboard, open a browser and visit the http://<value_of_public_ip_field>/v2/status/json URL address. You should see a small JSON object that vouches for the health of your installation.
Alternatively, you can use curl from a shell terminal: assuming your IP is 3.80.89.147, the following command will confirm that the AMI has been deployed successfully and that the WM Server is up and running.
$ curl  http://3.80.89.147/v2/status/json
{
    "lookup_request": 0,
    "lookup_useragent": 0,
    "lookup_device_id": 0,
    "make_model_requests": 0,
    "server_info_requests": 8,
    "v1_capabilities_requests": 0,
    "not_found_404": 0,
    "server_uptime": 1172
}
if your instance responds with something like this, everything looks good. Your WURFL Microservice server is up and running!
Using WM Clients
WM Client APIs are available for the following supported languages (regardless of the capability set): Go (golang), Java, .NET, PHP, Node.js, Python, Scala, Rust and Kotlin.
WM Client APIs for the respective languages are provided on the ScientiaMobile public github repository:
- Golang: https://github.com/WURFL/wurfl-microservice-client-golang
- Java: https://github.com/WURFL/wurfl-microservice-client-java
- dotNET: https://github.com/WURFL/wurfl-microservice-client-dotnet
- PHP: https://github.com/WURFL/wurfl-microservice-client-php
- Node.js: https://github.com/WURFL/wurfl-microservice-client-nodejs
- Python: https://github.com/WURFL/wurfl-microservice-client-python
- Scala: https://github.com/WURFL/wurfl-microservice-client-scala
- Rust: https://github.com/WURFL/wurfl-microservice-client-rust
- Kotlin: https://github.com/WURFL/wurfl-microservice-client-kotlin
You can find the documentation for each API here:
Maven Central, Nuget and NPM also carry the WM Client API libraries for Java, .NET and Node.js respectively.
© 2026 ScientiaMobile Inc.
All Rights Reserved.
NOTICE: All information contained herein is, and remains the property of ScientiaMobile Incorporated and its suppliers, if any. The intellectual and technical concepts contained herein are proprietary to ScientiaMobile Incorporated and its suppliers and may be covered by U.S. and Foreign Patents, patents in process, and are protected by trade secret or copyright law. Dissemination of this information or reproduction of this material is strictly forbidden unless prior written permission is obtained from ScientiaMobile Incorporated.
1875 Campus Commons Dr.
Suite 300
Reston, VA 20191
USA


